FastSpeech2 :基于Transformer的非自回归TTS
https://arxiv.org/abs/2006.04558
https://github.com/ming024/FastSpeech2 该代码使用 pytorch 框架
Dataset 是 PyTorch 中用来表示数据集的一个抽象类,我们的数据集可以用这个类来表示,至少复写下面两个方法即可:
1
2
__len__: 数据集大小 __getitem__: 可以通过下标的方式来获取第 i 个数据
FastSpeech2代码中通过 preprocess_config 和 train_config 以及之前处理的train.txt文件构建数据集
train.txt 构造如下(以标贝数据为例):数据以 | 分割,包含了“文件名”|“说话人”|“音素”|“拼音”,对应代码中变量 basename, speaker, text, raw_text
1 008894|BZNSYP|{sh e3 d e2 sh e3 d e2 sp y iou2 sh e3 c ai2 y iou3 d e2 sp sh e3 d e5 sp sh e3 de2 sp g ai1 sh e3 d e5 y iao4 sh e3 sp g ai1 d e2 d e5 y iao4 d e2}|she3 de2 she3 de2 you2 she3 cai2 you3 de2 she3 de5 she3 de2 gai1 she3 de5 yao4 she3 gai1 de2 de5 yao4 de2
speaker_map 保存在 speakers.json 中,保存了 speaker 对应的 id:
首先,定义 __len__,这里根据text这个列表的 len()计算即可;
其次,定义__getitem__:
1
2
3
4
5
6
7
8
"id": basename, # 008565 "speaker": speaker_id, # 0 "text": phone, # [12, 31, 213, 34, 41] "raw_text": raw_text, # she3 de2 she3 de2 you2 she3 cai2 "mel": mel, # np.array (466, 80) 466不固定 "pitch": pitch, # np.array (55, ) 55不固定 "energy": energy, # np.array (55, ) "duration": duration, # np.array (55, )
注意:mel、pitch、energy与duration是预处理保存的npy文件,对应的维数与 音频处理 中的帧、窗口等相关。后续详细介绍 preprocess.py文件的时候再解释。
解释数据细节:
phone
1
2
3
4
5
6
7
8
9
10
11
12
13
14
15
16
17
18
19
20
21
22
23
24
25
26
27
28
29
30
31
32
33
34
35
36
# 英文共包含 84 个音素字符,来自cmudict,借鉴自 tacotron(https://github.com/keithito/tacotron) valid_symbols = [ "AA", "AA0", "AA1", ...... "Z", "ZH", ] # 中文包含开头 23 个字符,结尾 185 个字符,再包括一个儿化音字符 “rr”,中文共209个字符,来自 pinyin initials = [ "b", "c", ...... "z", "zh", ] finals = [ "a1", "a2", "a3", ...... "vn4", "vn5", ] # 特殊的字符如下 _pad = "_" _punctuation = "!'(),.:;? " _special = "-" _letters = "ABCDEFGHIJKLMNOPQRSTUVWXYZabcdefghijklmnopqrstuvwxyz" _silences = ["@sp", "@spn", "@sil"] # 音素中都是以@开头 _arpabet = ["@" + s for s in cmudict.valid_symbols] _pinyin = ["@" + s for s in pinyin.valid_symbols]
Dataset 中的 collate_fn 函数的功能,以及本代码中collate_fn :
collate_fn 的输入是一批样本,对batch进行处理,在这里我们text的长度,mel、ptich等,每个样本的长度是不一样的,我们需要将每一个 batch 中各样本长度 pad 到一致!这就有了 reprocess 和 collate_fn 这两个方法了。
reprocess这个函数发挥了主要功能:pad,返回的结果如下:
1
2
3
4
5
6
7
8
9
10
11
12
ids, # list, ['004717', '008813', ...] 一个batchsize的 文件名 raw_texts, # list, 一个batchsize的 拼音/英文 序列 speakers, # array, 说话人对应的标号 [0, 0, ...] texts, # array,pad 后的 音素对应的标号,按照0进行pad text_lens, # array, 每个样本texts的长度 [34, 33, ... 12] max(text_lens), # 最大长度, 34 mels, # np.array, (16, max_len, 80) mel_lens, # np.array, 每个样本mels 的长度 max(mel_lens), # 最大长度, 372 pitches, # 和 text 的长度是对应的, 短的样本 pad 0 energies, # 同 pitches durations, # 同 durations
collate_fn这个函数功能:借助reprocess,同时 进行 sort 和 drop_last,返回结果:
1 list, [(reprocess的结果) * group_size],
DatLoader 本质是一个可迭代对象,使用iter()访问,每次返回一个batchsize的数据,提供了shuffle。
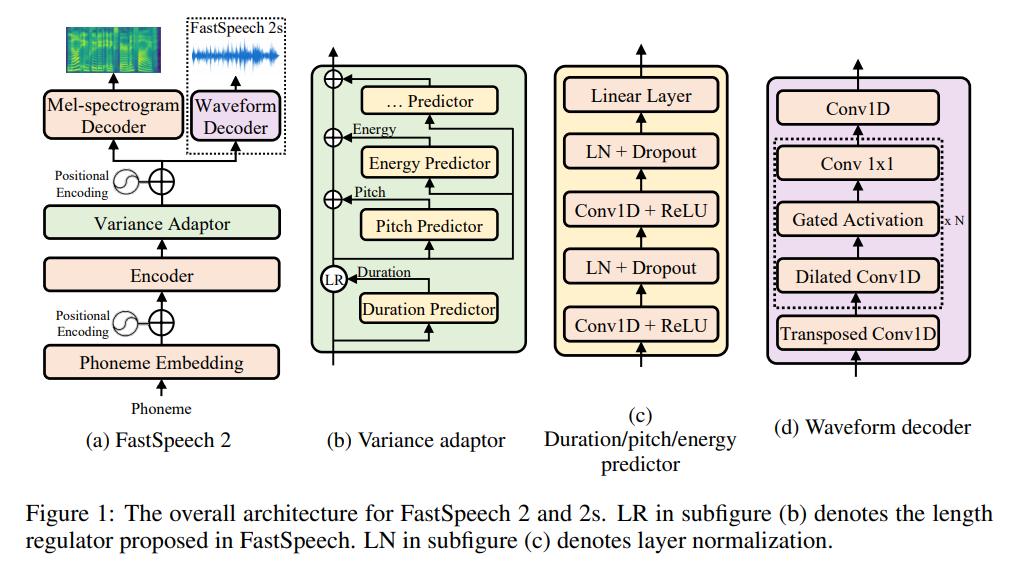
放一张FastSpeech2论文里的模型框架图吧!
主要的结构是:Encoder + Variance Adaptor + Mel-spectrogram Decoder
Encoder:变异Transformer
Variance Adaptor:
Mel-spectrogram Decoder: 变异Transformer
前向传播 forward:
1
2
3
4
5
6
7
8
9
10
11
12
13
speakers, # 同 reprocess 返回结果 texts, src_lens, max_src_len, mels=None, mel_lens=None, max_mel_len=None, p_targets=None, e_targets=None, d_targets=None, p_control=1.0, # 控制 pitch e_control=1.0, # 控制 energy d_control=1.0, # 控制 duration
首先要介绍这个 mask ,由于我们之前将 texts 中长度不一样的进行了 pad,那么在以后的计算中是要mask的。
1
2
3
get_mask_from_lengths: 输入:src_lens (一个batch中每一个样本text的长度), max_src_len(一个batch中text的最大长度) 输出:np.array, shape=(batch_size, max_src_len), 对应的元素为是否应该被 mask
举个例子:
1
2
3
4
5
6
7
8
9
10
11
12
13
14
15
16
17
18
19
src_lens = tensor([1, 3, 5, 6]) max_src_len = 6 ids = tensor([[0, 1, 2, 3, 4, 5], [0, 1, 2, 3, 4, 5], [0, 1, 2, 3, 4, 5], [0, 1, 2, 3, 4, 5]]) src_lens_expand = tensor([[1, 1, 1, 1, 1, 1], [3, 3, 3, 3, 3, 3], [5, 5, 5, 5, 5, 5], [6, 6, 6, 6, 6, 6]]) mask = ids >= src_lens_expand = \ tensor([[False, True, True, True, True, True], [False, False, False, True, True, True], [False, False, False, False, False, True], [False, False, False, False, False, False]]) shape 是 (barch_size, max_src_len) 这些Ture都是原来Pad的,后续计算需要mask的!
接下来,看一下Encoder 这里详细的过程了,顺便介绍一下Transformer结构,以及看一看Q、K、V在这里到底学到的是什么东东!
src_word_emb:将 text 中的音素,对应到一个 256 维的向量,利用pytorch中的nn.Embedding即可。
get_sinusoid_encoding_table: Sinusoid position encoding table
这个 Positional Encoding 是 Transformer 特有的,论文中提到由于没有用到RNN和CNN提取特征,所以没有很好的应用位置信息,所以需要在 input Embedding 后加上 Positional Encodeing。公式如下:
P E ( p o s , 2 i ) = s i n ( p o s / 1 0 0 0 0 ( 2 i / d m o d e l ) ) PE_{(pos, 2i)} = sin(pos/10000^{(2i/d_{model})})
P E ( p o s , 2 i ) = s i n ( p o s / 1 0 0 0 0 ( 2 i / d m o d e l ) )
P E ( p o s , 2 i + 1 ) = c o s ( p o s / 1 0 0 0 0 ( 2 i / d m o d e l ) ) PE_{(pos, 2i+1)} = cos(pos/10000^{(2i/d_{model})})
P E ( p o s , 2 i + 1 ) = c o s ( p o s / 1 0 0 0 0 ( 2 i / d m o d e l ) )
这个参数是不需要学习的,由于sin与cos的关系,PE_{(pos + k)}与PE_{(pos)}可以很容易的表示成线性关系。
FFTBlock:MultiHeadAttention 和 PositionwiseFeedForward 构成
注意力机制:
<后续整理>,相关内容可参考李宏毅ML中的介绍 self attention .
VarianceAdaptor 是 FastSpeech2 的核心,主要分为以下三个部分:
LengthRegulator(这个FastSpeech就有了)
duration_predictor(这个是比较关键的)
pitch_predictor and energy_predictor
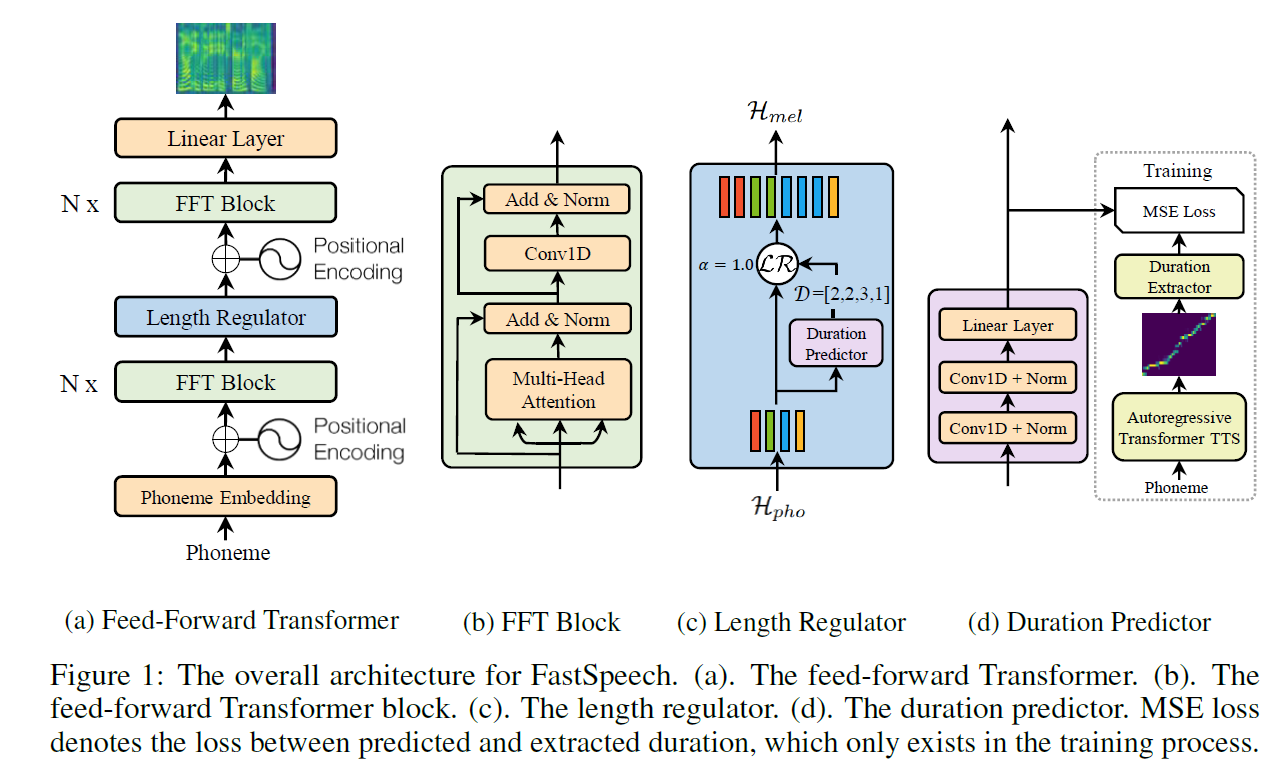
下图是FastSpeech的流程图,可以更好的理解 LengthRegulator:
duation and ptich and energy predictors 都用了一个框架:
两次 {Conv1D + ReLU + LN + Dropout} + Linear Layerx = x.contiguous().transpose(1, 2) 即可实现,卷积运算完成之后进行后续 ReLU … 等操作!(这个是由于 pytorch 框架导致的),在conv1d中输入是 [batch, channels, w],conv2d中输入是 [batch, channels, H, W]。
接下来,Encoder 的输出分别输入到 duation、pitch和energy的预测器中,输出结果为 [batch, max_text_len],
由于pitch和energy都是一个值,这里用到了Pytorch中一个不是特别常见的函数torch.bucketize(input, boundaries, *, out_int32=False, right=False, out=None) → Tensor。这是Pytorch中的分桶函数,boundaries确定了各个桶的边界,是一个单调递增向量,用于划分input,并返回input所属桶的索引,桶索引从0开始。然后利用nn.Embedding 将其映射到 256 维。
1
2
3
4
5
6
7
8
9
10
self.pitch_embedding = nn.Embedding( n_bins, model_config["transformer"]["encoder_hidden"] ) self.pitch_bins = nn.Parameter( torch.linspace(pitch_min, pitch_max, n_bins - 1), requires_grad=False, ) self.pitch_embedding( torch.bucketize(prediction, self.pitch_bins) )
将 Encoder 的输出 加 ptich和energy的值,利用LR对齐到mel_len。
LengthRegulator介绍:
1
2
3
4
5
6
7
8
9
10
11
def expand(self, batch, predicted): out = list() # print(batch.shape) 这里batch 代表一个样本 shpe = (max_len_text, 256) for i, vec in enumerate(batch): # print(i) # 这里是每个 音素 # print(vec.shape) 256 expand_size = predicted[i].item() # 3 out.append(vec.expand(max(int(expand_size), 0), -1)) # [(3, 256), (4, 256), (2, 256), ...] 代表 每个音素 out = torch.cat(out, 0) # 按照 0 轴进行拼接 return out
Decoder 与 Encoder结构一样,不过变成了 6 层。
mel_linear 将 256 维数 变为 n_mel_channels: 80。
postnet 精细化 mel 谱,这是 Tacotron2 留下来的,5个1维卷积层
至此,FastSpeech2 的网络结构介绍完毕!
这里利用了 Adam 算法,又加入了一些其他功能,详细介绍如下:
超参数:
1
2
3
4
5
6
7
8
9
10
optimizer: batch_size: 16 betas: [0.9, 0.98] eps: 0.000000001 weight_decay: 0.0 grad_clip_thresh: 1.0 # Clipping gradients to avoid gradient explosion grad_acc_step: 1 # Clipping gradients to avoid gradient explosion warm_up_step: 4000 # 开始降低学习率 anneal_steps: [300000, 400000, 500000] anneal_rate: 0.3 # 30W 以后,还要降低学习率
定义优化器:
1
2
3
4
5
6
torch.optim.Adam( model.parameters(), betas=train_config["optimizer"]["betas"], eps=train_config["optimizer"]["eps"], weight_decay=train_config["optimizer"]["weight_decay"], )
初始化学习率:
1
2
encoder_hidden = 256 self.init_lr = np.power(model_config["transformer"]["encoder_hidden"], -0.5) # 0.0625
更新学习率:
1
2
3
4
5
6
7
8
9
10
11
12
13
train_logger = SummaryWriter(train_log_path) log(train_logger, step, losses=losses) log( train_logger, fig=fig, tag="Training/step_{}_{}".format(step, tag), ) log( train_logger, audio=wav_reconstruction, sampling_rate=sampling_rate, tag="Training/step_{}_{}_reconstructed".format(step, tag), )
将音频及文本文件处理成 <text, wav>对儿文件,为后续MFA及提取mel、duration、pitch及enengy做准备。
1
2
3
4
5
6
7
8
9
10
11
12
13
14
15
16
17
18
19
20
21
22
23
24
25
26
27
28
29
30
31
32
33
34
35
36
37
38
39
import os import librosa import numpy as np from scipy.io import wavfile from tqdm import tqdm def prepare_align(config): in_dir = config["path"]["corpus_path"] # 原始音频保存位置 out_dir = config["path"]["raw_path"] # <.lab, .wav>保存位置 sampling_rate = config["preprocessing"]["audio"]["sampling_rate"] # 采样率 max_wav_value = config["preprocessing"]["audio"]["max_wav_value"] # 16bit 32768 speaker = "BZNSYP" # 说话人 i = 1 # 打开保存的 标注文件,获取每一个样本的拼音 with open(os.path.join(in_dir, "ProsodyLabeling", "000001-010000.txt"), encoding="utf-8") as f: for line in tqdm(f): if i % 2 == 1: wav_name = line[:6] wav_path = os.path.join(in_dir, "Wave", "{}.wav".format(wav_name)) if os.path.exists(wav_path): os.makedirs(os.path.join(out_dir, speaker), exist_ok=True) wav, _ = librosa.load(wav_path, sampling_rate) # 按照采样率 22050进行采样 wav = wav / max(abs(wav)) * max_wav_value # 对wav进行归一化 wavfile.write( os.path.join(out_dir, speaker, "{}.wav".format(wav_name)), sampling_rate, wav.astype(np.int16), ) # 保存wav文件 if i % 2 == 0: text = line.strip("\n").strip("\t") with open( os.path.join(out_dir, speaker, "{}.lab".format(wav_name)), "w", ) as f1: f1.write(text) # 保存 拼音 文件 i += 1
利用 MFA 工具 提取音素到mel的对齐信息 TextGrid。具体见本博客中 MFA安装及使用。
利用 TextGrid 与 <.lab, .wav>获得 mel, duration, pitch, energy 及 stats, speaker 及 train, val 数据集
下面以单一样本 LJS001-0001 为例进行解释:
1
2
3
4
5
6
7
8
9
10
11
12
13
14
15
16
17
18
19
20
21
22
23
24
25
26
27
28
29
30
31
32
33
34
35
36
37
38
39
40
41
42
43
44
45
46
47
# 首先利用 `tgt` 包读入 TextGrid import tgt textgrid = tgt.io.read_textgrid(tg_path) tier = textgrid.get_tier_by_name("phones") # 其次利用得到的tier计算 phones, duration, start_time, end_time # 这里将 开头及结尾 静音 silence 进行了过滤 def get_alignment(self, tier): sil_phones = ["sil", "sp", "spn"] phones = [] durations = [] start_time = 0 end_time = 0 end_idx = 0 for t in tier._objects: s, e, p = t.start_time, t.end_time, t.text # Trim leading silences if phones == []: if p in sil_phones: continue else: start_time = s if p not in sil_phones: # For ordinary phones phones.append(p) end_time = e end_idx = len(phones) else: # For silent phones phones.append(p) durations.append( int( np.round(e * self.sampling_rate / self.hop_length) - np.round(s * self.sampling_rate / self.hop_length) ) ) # Trim tailing silences phones = phones[:end_idx] durations = durations[:end_idx] return phones, durations, start_time, end_time
这里 duration 是 每个音素对应的帧数,需要用到sampling_rate 与 hop_length.
1
2
3
4
5
6
7
8
9
10
11
# 计算 pitch import pyworld as pw pitch, t = pw.dio( wav.astype(np.float64), self.sampling_rate, frame_period=self.hop_length / self.sampling_rate * 1000, ) pitch = pw.stonemask(wav.astype(np.float64), pitch, t, self.sampling_rate) pitch = pitch[: sum(duration)]
1
2
3
4
# 利用 Tacotron 中 STFT 从wav中获得mel与energy mel_spectrogram, energy = Audio.tools.get_mel_from_wav(wav, self.STFT) mel_spectrogram = mel_spectrogram[:, : sum(duration)] energy = energy[: sum(duration)]
这里计算的 pitch 和 energy 都是帧级别的,不是音素级别的,所以要对 原始 pitch 和 energy 在 音素级别取平均:
1
2
3
4
5
6
7
8
9
10
11
12
13
14
15
16
17
18
19
20
21
22
23
from scipy.interpolate import interp1d # 插值函数 # 把那些 pitch 为 0 的进行了线性插值!,然后再按照音素级别取平均 nonzero_ids = np.where(pitch != 0)[0] interp_fn = interp1d( nonzero_ids, pitch[nonzero_ids], fill_value=(pitch[nonzero_ids[0]], pitch[nonzero_ids[-1]]), bounds_error=False, ) pitch = interp_fn(np.arange(0, len(pitch))) # Phoneme-level average pos = 0 for i, d in enumerate(duration): if d > 0: pitch[i] = np.mean(pitch[pos : pos + d]) else: pitch[i] = 0 pos += d pitch = pitch[: len(duration)]
保存 .npy 文件,方便后续训练模型
1
2
3
4
5
6
7
8
9
10
11
12
13
14
15
# Save files dur_filename = "{}-duration-{}.npy".format(speaker, basename) np.save(os.path.join(self.out_dir, "duration", dur_filename), duration) pitch_filename = "{}-pitch-{}.npy".format(speaker, basename) np.save(os.path.join(self.out_dir, "pitch", pitch_filename), pitch) energy_filename = "{}-energy-{}.npy".format(speaker, basename) np.save(os.path.join(self.out_dir, "energy", energy_filename), energy) mel_filename = "{}-mel-{}.npy".format(speaker, basename) np.save( os.path.join(self.out_dir, "mel", mel_filename), mel_spectrogram.T, )